Putting answers to work
Use a customer's answers in project tasks and emails with merge fields, hold a task or phase until a set is answered, save answers into your records after a preview, export a request, and fill a request in from a file.
An answered information request is not the end of the job. The answers can fill in task wording and emails, release the tasks that were waiting for them, update the customer's records and go to a supplier as a PDF. This page covers each. For sending and reviewing requests, see Information requests.
A project's Information tab
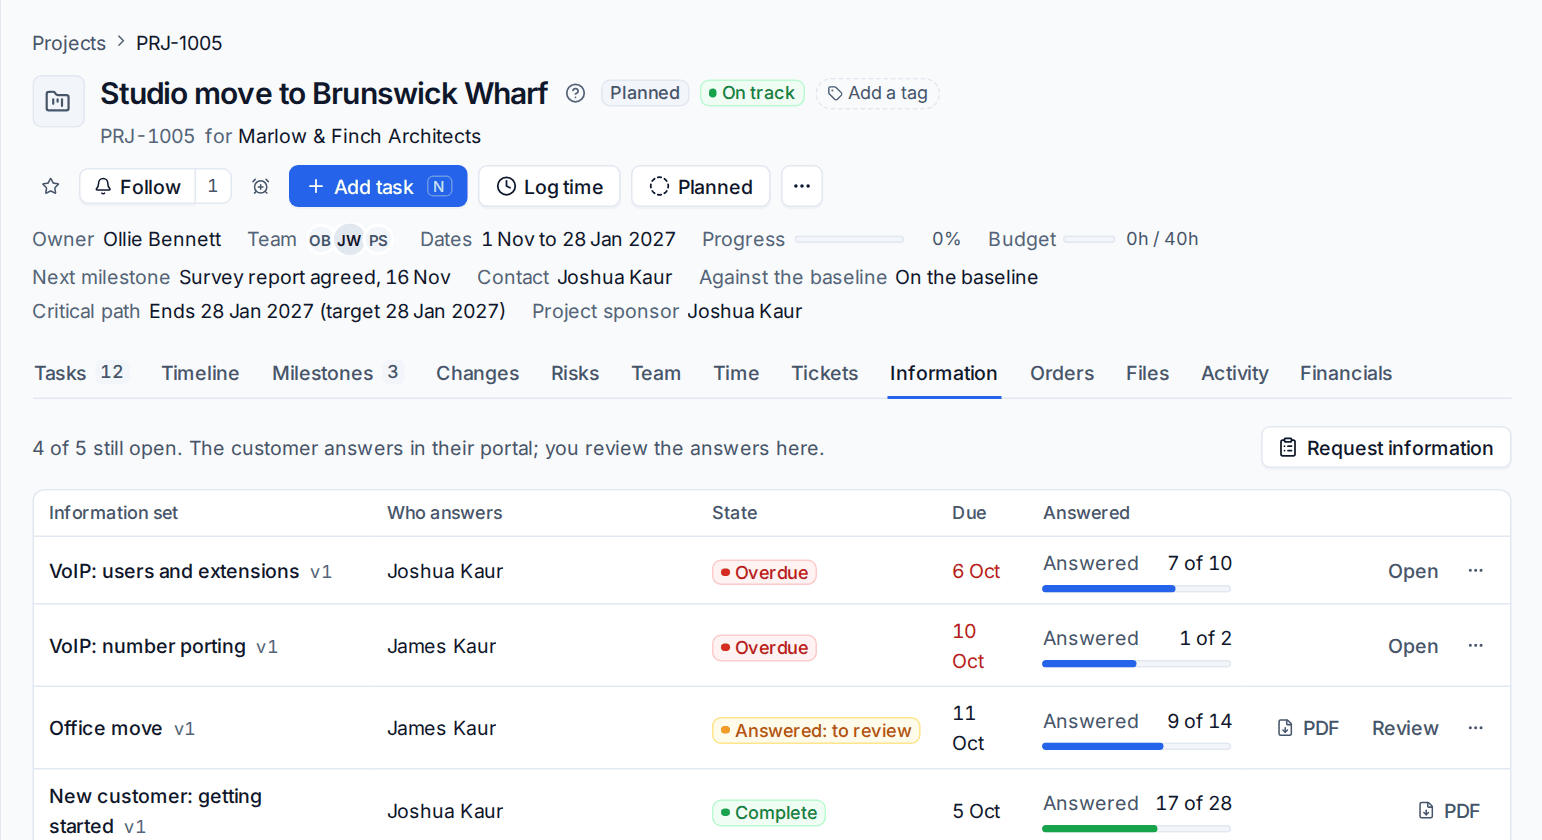
Every project has an Information tab listing the sets asked for on it: who answers each, its state, when it is due and how much is answered. Request information sends another set, Send sends one that is not sent yet, Review opens answers that are waiting for you and PDF downloads a finished one.
Merge fields
An answer can be dropped into text wherever a project uses it: task titles, task descriptions, checklists and project emails.
- In the text, press Insert an answer.
- Find the question and choose it. For a table question you choose the column.
The field is written as {{info.<set>.<question>}}, naming the set and the question's Key from the form builder. Put one in a project template, such as the new office's address in the title of the task that orders the line, and every project made from the template fills it in from that customer's answers. The menu marks a set whose request is not complete yet.
Tasks and phases that wait for answers
Some tasks should not start until the customer has answered. A task, or a whole phase, can wait for an information set:
- On the task, choose the set under Waits for information. On a phase, choose the Information set it waits for; all its tasks then wait.
- Until the request for that set is complete, the task shows Waiting for information from and the contact's name. If the set has not been requested yet, it says so and points you to the project's Information tab to send it.
- When you mark the request complete, the task becomes ready and the people on it are told they can start.
Set this on a project template and every project made from it holds the right tasks until its own request is complete, for example "Port numbers" waiting for VoIP: number porting. See Project templates and Phases, tasks and dependencies.
Save answers into records
Answers such as a new office address belong in the customer's records, not only in the request. In the form builder, each question has Save the answer into:
| Save into | What it updates |
|---|---|
| A site's address | The address of one of the customer's sites, or a new site |
| A contact's phone | A contact's phone number |
| A line in the connectivity inventory | The details of a line, one line per row for a table question |
| A page in the customer's documentation | A new page, or an update to an existing one |
Nothing is written without you seeing it first:
- Open the request and press Save into records.
- For each answer, choose the record it goes to, such as which site. The dialog shows the value now and what it becomes, line by line. Where the record already says the same, it tells you nothing changes.
- Untick anything you do not want saved.
- Press Save into 1 record (the button counts them).
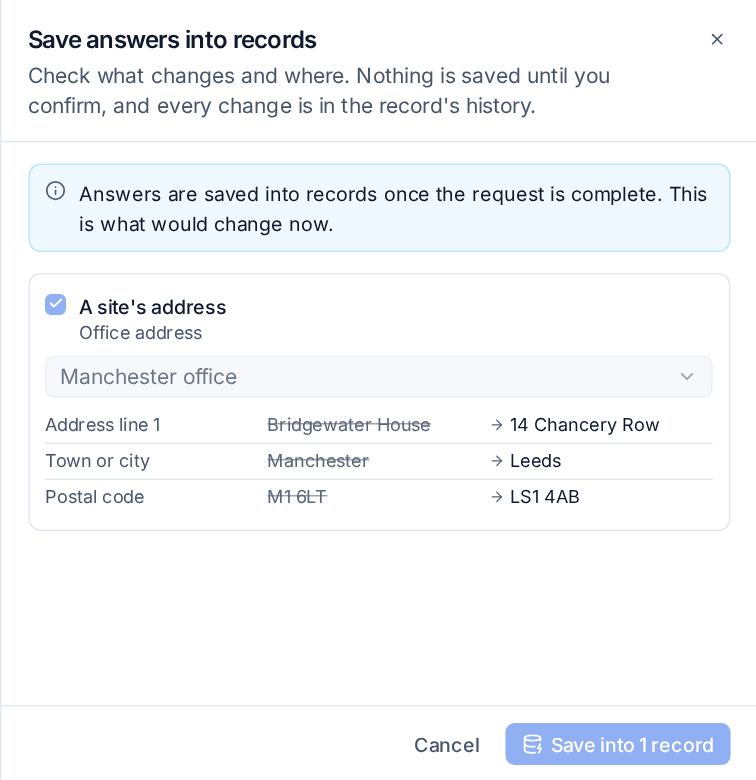
Answers are saved once the request is complete; before that the dialog is a preview of what would change. Every change is kept in the record's history, and the request notes when it was saved and by whom.
Export a request
On the request page:
- PDF downloads the request and its answers as a branded PDF, such as the porting details to send to the carrier.
- Export offers each table in the request as CSV or Excel, such as the list of users and extensions, and Every answer as CSV.
Fill a request in from a file
Often the answers already exist in a file: the old provider's export, a phone bill, a spreadsheet of users. With AI set up, Tenvara can read the file and fill in the answers it finds, for a person to check. This is optional and uses your own AI provider key from Settings > AI.
- Turn on Fill in answers from a file with AI under Information requests on the What customers see tab of Settings > Customer portal. The same card sets the largest file read and the most PDF pages read.
- Before sending a request, your team can use Fill in from a file before sending. In the portal, the contact sees Attach a file to fill this in for me.
- Attach a CSV, Excel, PDF or text file. Each answer found is marked "From (the file's name), please check".
- Check each one: confirm it or change it. Nothing is sent until that is done, and the file is kept with the request.
Passwords, PINs and porting codes are never filled in from a file: they are always typed by a person. When AI is off, the option does not appear and requests work exactly as before.
Note: Treat a filled-in answer as a suggestion. The person answering is responsible for every answer they send, which is why each one must be checked first.
Related
Was this page helpful?
Thanks for the feedback.