Brand profiles
Set your product name, logos, colours and customer wording on a brand profile, add profiles for other trading names, and choose which customers use each one.
A brand profile holds everything that makes Tenvara look like your product. You edit one profile at a time in Settings > Branding, beside a live preview of the web app, the portal, a customer email and an invoice.
Choosing a profile
The picker at the top right lists every profile with its product name and how many customers use it. Pick one to edit it.
- Default profile: used by every customer without a profile of their own. There is always exactly one default.
- Profile for some customers: any other profile, used only by the customers assigned to it.
Adding a profile
Add a profile when you trade under a second name and want its customers to see that name.
- Press New profile.
- Enter a Profile name. Only your team sees it, to tell profiles apart.
- Under Start from, choose The standard look, or A copy of an existing profile to start from its settings.
- Press Add profile.
The ... menu beside Choose customers has three more actions:
| Action | What it does |
|---|---|
| Make this the default | Every customer without a profile of their own now uses this one |
| Reset to the standard look | Clears the name, logos, colours, wording and help settings. Custom domains and customers stay as they are |
| Delete profile | Removes the profile. Its customers go back to the default. You cannot delete the default |
Name
| Field | What it is |
|---|---|
| Product name | What the product is called everywhere Tenvara appears: page titles, sign in, emails, PDFs, the agent and the portal. Empty keeps the standard name |
| Company name | Your trading name on customer documents and emails |
| Agent name | What the agent, its tray icon and installer are called on devices. Empty means your product name followed by "Agent" |
| Profile name | Only you see this |
Logos
Upload SVG or PNG files. You crop each one before it is saved, and Tenvara checks the size and the contrast against the background it is shown on.
| Image | Where it shows |
|---|---|
| Logo on light | The full logo for light backgrounds: the app in light, sign in, emails and PDFs. At least 240 by 48 pixels |
| Logo on dark | The same logo for dark backgrounds. Without one, the light logo is used |
| Square mark | The symbol alone: the app's rail, the favicon, app icons and the agent's tray icon. At least 256 pixels square |
| Sign-in background | An optional photo behind the sign-in page, softened so the form stays readable. JPEG is accepted here too |
| Assistant avatar | The picture beside the AI assistant's messages in chat |
The favicon, the Apple touch icon and the Windows icons are made for you from the square mark. SVGs are kept as vectors, and anything in an SVG that could run (scripts, event handlers, external references) is refused. A profile with a name but no logo shows its name in type.
Colours
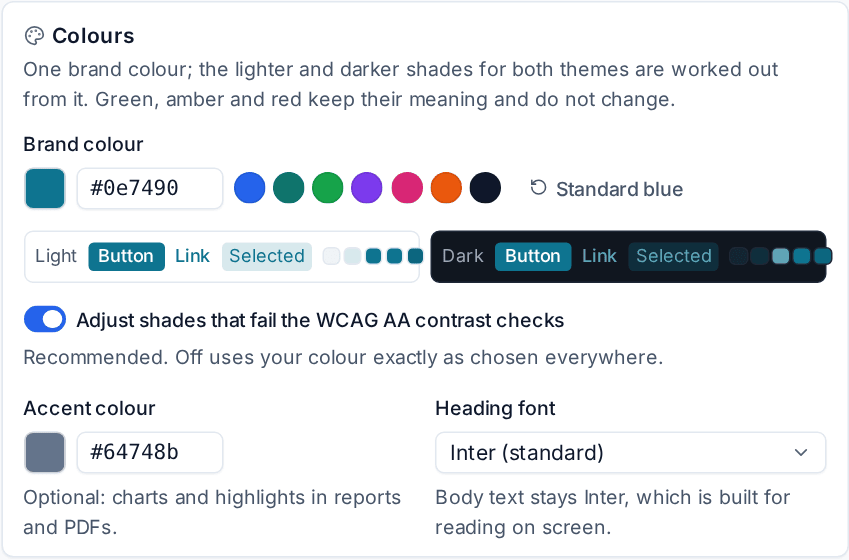
- Pick a Brand colour, either a swatch or a hex value. Standard blue puts Tenvara's blue back.
- Check the swatches for Light and Dark: the button, link and selected shades are worked out from your colour for both themes.
- Leave Adjust shades that fail the WCAG AA contrast checks on (recommended). A colour that would be hard to read is nudged only where it fails: buttons keep your colour and get white or black text, whichever reads better, and links use a shade that reads on each theme. The card lists what was adjusted. Turn it off to use your colour exactly, with warnings.
- Optionally set an Accent colour for charts and highlights in reports and PDFs.
- Optionally choose a Heading font: Manrope, Plus Jakarta Sans, DM Sans, Figtree or Source Serif 4. Body text stays Inter.
Green, amber and red keep their meaning and never change. Email buttons and links use your brand colour too.
Customer portal, emails and chat
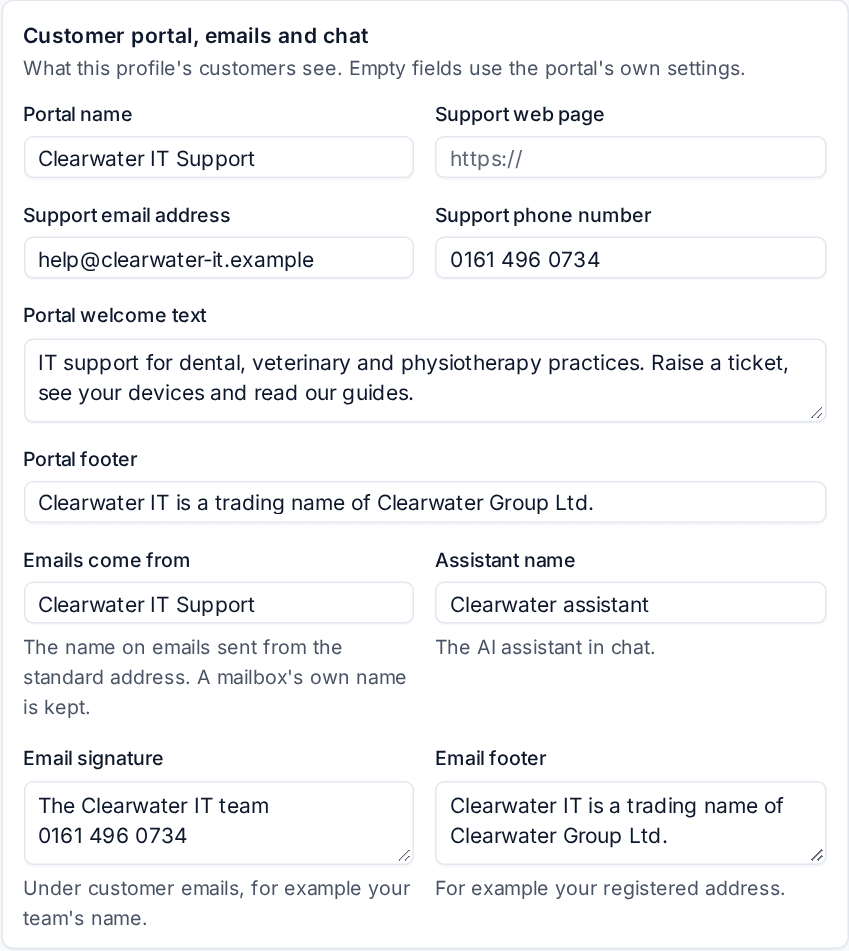
These fields set what this profile's customers read. Empty fields fall back to Settings > Customer portal.
- Portal name, Portal welcome text and Portal footer.
- Support web page, Support email address and Support phone number, shown in the portal and on the agent.
- Emails come from: the name on emails sent from the standard address. A mailbox's own name is kept.
- Email signature and Email footer: under customer emails, for example your team's name and your registered address.
- Assistant name: the AI assistant in chat.
Help and powered by
- Help and documentation links: Standard help (the Tenvara guide), Your own (an address you give) or Hidden.
- Hide help links from customers: the portal shows none, while your team keeps them.
- Show "Powered by Tenvara" to your team: a small line on the sign-in page and in About. On by default.
- Show "Powered by Tenvara" to customers: off by default, so the portal, emails and chat carry only your brand.
Saving
Unsaved changes show a bar with Discard and Save changes. The preview on the right redraws as you type; switch it between Light and Dark. Open the real email and Open the real PDF show what the server really sends for the saved profile: a portal invitation and the newest invoice in this brand.
Which customers use a profile
There are three ways to assign customers:
- From the profile: press Choose customers, pick them under Add customers, and press Use this brand.
- From the customer: the customer page's details show their Brand. Press the pencil, choose a Brand profile and press Save.
- From the customer list: select several customers and use the bulk action Set brand.
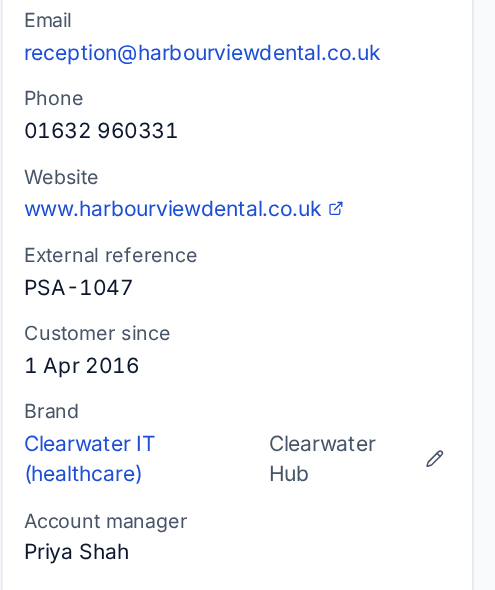
Choosing the default profile for a customer stores it as "the default", so they follow whichever profile is the default later. Moving a customer changes their portal, emails, documents and devices straight away.
Related: Custom domains, What your customers see.
Was this page helpful?
Thanks for the feedback.