Install settings and profiles
The settings a self-hosted administrator meets in the install's .env file, renaming older settings before an update, the small, standard and large install profiles with their sizing guidance, and how much memory to give the backup service.
A self-hosted Tenvara install keeps its settings in one file, .env, in the install folder beside the compose file. The installer writes it, an update keeps what you set, and most installs never need to open it. This guide covers the handful of settings an administrator does meet, and how the install sizes itself for its server.
On a hosted instance none of this applies: we size and run the install for you.
Note: After changing
.env, rundocker compose up -din the install folder so the change takes effect, or let the next update apply it.
The settings you meet
Every setting of Tenvara's own starts with TENVARA_.
| Setting | What it is for |
|---|---|
TENVARA_DOMAIN, TENVARA_SITE_ADDRESS |
The address your install answers on. Set by the installer from --domain. |
TENVARA_INSTALL_PROFILE |
The install profile: small, standard or large. Leave it out to have it picked from the server (below). |
TENVARA_BACKUP_MEMORY |
The memory the backup service may use, for example 2g, 4g or 6g (below). |
TENVARA_AGENT_TLS_PROBE, TENVARA_AGENT_TLS_PINS |
For when something else ends TLS in front of the server. Agents pin the certificate key your install presents; these tell the server which key agents will really meet. |
TENVARA_TURN_ENABLED, TENVARA_TURN_PUBLIC_IP, TENVARA_TURN_SECRET, TENVARA_TURN_TLS_HOST |
The relay for remote control, and the name its TLS certificate is issued for. |
TENVARA_PUBLIC_DNS |
The resolvers the server asks when it checks its own names against public DNS (the relay's TLS name, the name agents meet). Public resolvers by default; set a comma-separated list (https:// addresses for DNS over HTTPS, or ip:port) when the server cannot reach them, or off. |
TENVARA_CSP_IMG_SRC |
The address of your own map tile server, if you chose one in Settings > Scheduling. The built-in map providers need nothing. |
TENVARA_WEB_PROXY_MODE, TENVARA_WEB_PROXY_PORTS, TENVARA_WEB_PROXY_HOST |
How device web pages are served: at an address of their own under a wildcard name, or on a port per session (28100 to 28199 unless you choose another range). See below. |
TENVARA_MIGRATE_MEMORY |
The memory the database step of an update may use, 2G unless you set it. Raise it when an update says a database change ran out of memory. See Updates. |
TENVARA_MAILIN_INTERNAL_TOKEN |
The secret shared between Tenvara and its mail receiver. Only of interest when the mail receiver runs on another server, which needs the same value. |
Two settings you may meet have no prefix:
OUTBOUND_ALLOW_HOSTS: Tenvara refuses to fetch from internal and metadata addresses on your behalf. If something it must reach is on your own network (an old system you are migrating from, for example), list its host here, comma separated.QUEUE_MAX_PROCESSES: the cap on background worker processes. Left empty, it is worked out from the server's memory.
Installing self-hosted covers the address, TLS and relay settings in context.
When TLS ends somewhere else
Agents refuse a server whose certificate key is not one the install vouches for, so nothing in the middle can stand in for it. Normally the install reads the key from its own front door and you set nothing.
- Behind a load balancer or CDN that ends TLS, set
TENVARA_AGENT_TLS_PROBE=public, so the server reads the key at its public name, which is what agents meet. - To add a key by hand (another proxy in front, or the next key ahead of a planned change), list it in
TENVARA_AGENT_TLS_PINSassha256/<base64>, comma separated.
A key the front door has presented stays trusted for 14 days after it was last seen, so a normal renewal needs nothing from you.
Device web pages and their ports
Device web pages open a device's own web interface (a NAS, a printer, a switch or a UPS) through an agent on its network. Each session is served at an address of its own, so the device's links, cookies and redirects keep working. TENVARA_WEB_PROXY_MODE chooses how: auto (the default) decides from what the install can do, wildcard or ports.
- Wildcard (best): each session gets an address under
*.and your install's name. It needs a DNS record for*.and your install's name pointing at the install, and a certificate that covers it. With the built-in front door each name gets its certificate when it is first opened. - Ports: each session gets a port on your install's own name from
TENVARA_WEB_PROXY_PORTS, 28100 to 28199 unless you choose another range. Allow this range through your firewall to the server. Keep a range of your own below the ports Linux hands out for outgoing connections (32768 upwards on most servers), or the front door may not be able to start.
To check what the install can use, run docker compose exec core php artisan web-proxy:check in the install folder. It says what to change when something is missing; run it again after changing DNS or the certificate. A changed port range needs docker compose up -d caddy core.
In ports mode, give the session ports a name of their own: add a DNS record webpages. and your install's name, pointing at the same address, and run the update. Sessions then open on that name, apart from the app's own. Behind another proxy that ends TLS, pass the wildcard name and the port range on to the install, and set TENVARA_WEB_PROXY_HOST yourself. When your install's site address is plain HTTP behind a TLS proxy of your own, the session ports are plain HTTP too, and an update keeps it that way.
Renaming older settings before an update
An install made by an older installer has settings with an older prefix. Tenvara now reads only the TENVARA_ names, and it does not rewrite your file for you. When you update such an install, the update stops before it changes anything and names each setting it needs, so the install keeps running on the version it had.
Every setting keeps the rest of its name; only the prefix changes. On the server, in the install folder, with Tenvara still on its old version:
old=$(sed -n -E 's/^([A-Z]+)_REMOTE_INTERNAL_TOKEN=.*/\1/p' .env | head -n1); echo "old prefix: $old"
cp .env .env.before-rename
sed -i -E "s/^(#[[:space:]]*)?${old}_/\1TENVARA_/" .env
grep -c "^${old}_" .env    # 0 when every line is renamed
Stop if the first line prints no prefix, or prints TENVARA: the file has already been renamed. Then run the update as usual.
- If you keep an override file, a service unit or a backup script of your own that names one of these settings, rename it there too.
- Going back to the older version needs the old names again: put
.env.before-renameback. - Install commands for agents carry
TENVARA_SERVERandTENVARA_TOKEN. A command copied before the rename installs the agent without enrolling it, so copy install commands again from Devices > Enrolment rather than reusing old ones.
See Updates for everything else an update checks.
Install profiles
The installer and every update pick one of three profiles from the server's CPUs and memory. The database, the event store, the queue workers and backups all size themselves from it, so a small server is not asked for more than it has and a large one is put to use.
| Profile | Picked when the server has | Sized for |
|---|---|---|
| Small | 2 vCPUs or fewer, or 8 GB of memory or less | 2 vCPUs and 8 GB: up to about 1,000 devices |
| Standard | anything between | 4 vCPUs and 16 GB: up to about 3,000 devices |
| Large | 8 vCPUs or more and 32 GB or more | 8 vCPUs and 32 GB upwards. Beyond about 3,000 devices, run the backup service on its own server |
A server with 2 vCPUs and 16 GB is still Small: CPUs are what such a server runs out of first.
The profile is picked again on every update, so a server you have resized gets its new profile by itself. The update says which profile is in force and why.
Choose your own
- Open
.envin the install folder. - Set
TENVARA_INSTALL_PROFILE=small,standardorlarge. - Run the update, or
docker compose up -d.
Updates keep a value you set. Remove the line to have the profile picked from the server again. A value that is not one of the three stops the update before anything changes, naming the line.
Check it
Settings > System status has an Install profile section: the profile in use and whether it was picked or set by you, the server's CPUs and memory, how many devices the install looks after, how the database is sized, and the sizing table with your row marked.
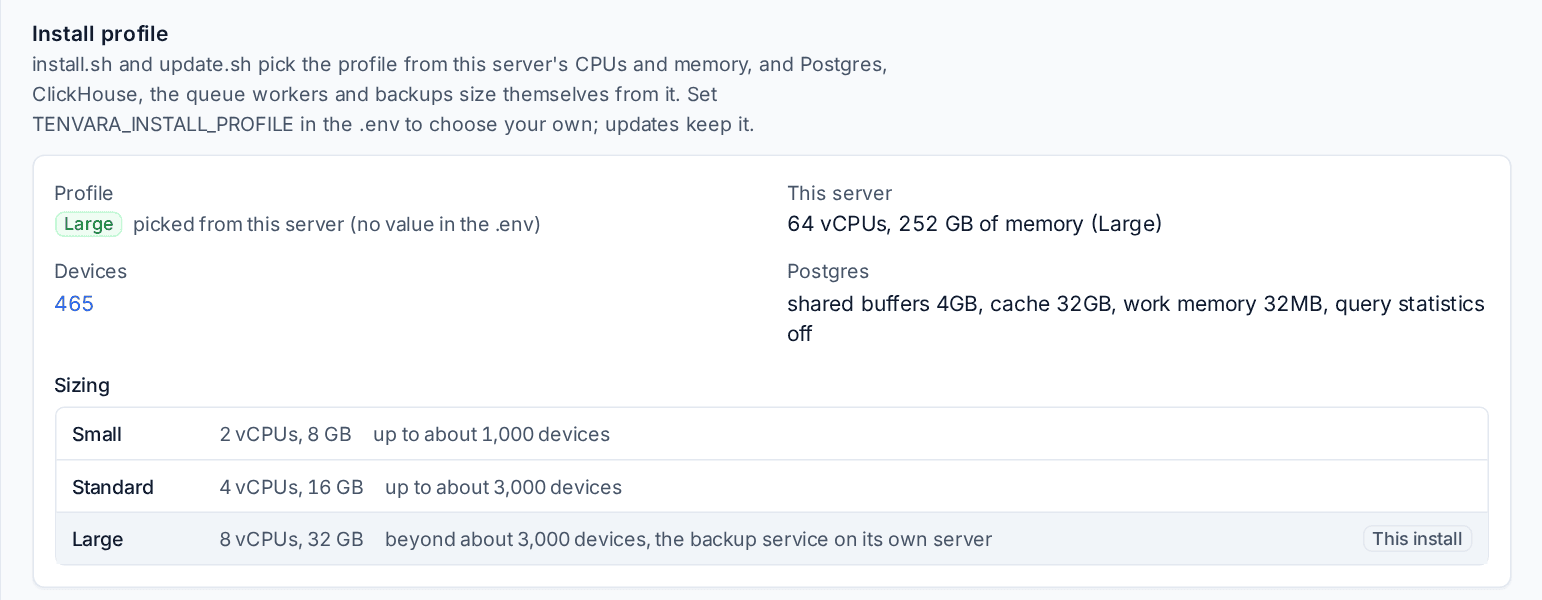
It warns when the install looks after more devices than its profile is sized for (move to the next size up, and the next update picks the larger profile), when a profile set by hand is larger than the server, and when the database is still on its stock settings. See System status.
Memory for the backup service
The backup service runs with a memory limit, 2 GB unless TENVARA_BACKUP_MEMORY says otherwise. It sizes its own work from that limit: how many Microsoft 365 tenants, mailboxes, drives and sites it backs up at once. More memory makes more run at once; it never makes one backup need more.
| Server and workload | TENVARA_BACKUP_MEMORY |
|---|---|
| A small server (2 vCPUs, 8 GB), a few tenants, device backups | 2g (the default) |
| Many tenants, or first backups of large tenants you want to run side by side | 4g |
| 16 GB or more, dozens of tenants seeding at once | 6g to 8g |
Leave the rest of Tenvara its share: on a busy server the other services together want at least 4 GB.
To raise it, set the value in .env and run docker compose up -d backup, or let the next update apply it. A value of your own is never changed by an update.
When memory is short, nothing fails: a part of a backup waits, and its job log says it is waiting for memory on the backup server. Settings > System status shows Backup service memory with how many tenants run at once, and Settings > Backup warns, with the value to set, when you ask for more tenants at once than the memory safely allows. See The first backups queue.
Related
Was this page helpful?
Thanks for the feedback.